Mickey Mouse Hot Cocoa Charcuterie Board
This charcuterie board is the ultimate sweet tooth guide for satisfying those late-night or early-morning sweet tooth cravings. Featuring everyone's favorite mouse, this board is perfect for bringing some magic to your holiday season. Follow these simple steps and you'll be able to make your very own Mickey Mouse hot cocoa charcuterie board in no time!

These drool-worthy Mickey Mouse Hot Cocoa Charcuterie Board will delight hot chocolate lovers! This Mickey-inspired will undoubtedly become one of your favorites, with an array of tantalizing grazing board ideas that will take your cup of hot chocolate to a whole new level of goodness. Delight your next party with a Mickey Mouse Hot Cocoa Charcuterie Board filled with delicious treats and adorable mouse-themed details. It's perfect for your Disney-obsessed friends!

Why You’ll Love This Charcuterie Board
- Charcuterie boards are an obvious choice for entertaining, and this one is a good choice for sweet tooth cravings.
- By varying the ingredients, you can make this charcuterie board as simple or as festive as possible.
- This is a festive way to brighten up any table with this fun holiday-themed hot cocoa charcuterie board!
The full ingredient list and directions are found below in the printable recipe card.
Equipment Needed to Make Charcuterie Board
- Board, Disney Mickey Mouse Board, or Plate
- Serving Knives (Optional)
- Ramekins
- Mickey Mouse Mold
- Mickey Mouse Cookie Cutter
- Mickey Mouse Hand Cookie Cutter
- Semi-Sphere Silicone Mold
- Piping Bag or Zip Lock Bag
Ingredients For Your Charcuterie Board
Cocoa Ingredients:
- Butterscotch Baking Chips
- Mint Filled Chocolates
- Milk Chocolate Cocoa Powder
- Candy Cane Sticks
- Kisses
- White Chocolate Lindor / Milk Chocolate Lindt Truffles
- Peppermint Lindor
- Snickerdoodle Lindor
- Mickey Cocoa Bombs
Extras:
- Christmas Baking Chips or Crushed Mints
- Snowflake Marshmallow Huggers
- Peppermint Bark or Ghirardelli Peppermint Squares
- White Chocolate Whoppers
- Candy Bells
- Mickey Mouse Candy Sprinkles
- Christmas Tree Marshmallows
- Peppermint Stripe Marshmallows
- Peppermint Sticks
- Hershey Chocolate Bar
- Hershey Cookie Bar
- Chocolate Spoons or Candy Cane Spoons
- Peeps Christmas Trees
- Christmas Candy Corn
- Red & Green M&M’s, plain or peanut
- Winter Holiday Shaped Jelly Candy or Christmas Wreath Candy
- Jordan Almonds
- White Chocolate Pretzels
Mickey Hot Chocolate Bomb Ingredients
- Red Candy Melts Chocolate
- Melted Black Candy Melts Chocolate
- Melted Yellow Candy Melts Chocolate
- Mini Marshmallows
- Hot Cocoa Mix
- Hot Milk
How To Make A Mickey Mouse Hot Cocoa Charcuterie Board
Step 1: Start with Mickey Cocoa Bomb
Add red chocolate to a small bowl and melt in the microwave in 30 seconds. Mix to combine. Place the red chocolate back in the microwave for another 30 seconds and mix again to combine. Repeat this step for the black chocolate.
Fill ½ of the molds with red melted chocolate ⅓ of the way full. Swirl the mold to get the red chocolate to coat all sides of the mold and keep the center hollow. Repeat with the other half of the molds with the black chocolate. Place in the freezer for about 25 minutes.
Very carefully remove the chocolate from the mold. In the red half add cocoa mix and mini marshmallows. Heat a small frying pan on low, take one of the black chocolate halves and press the open edges onto the pan for a few seconds to melt the chocolate. Connect the black half to the red half chocolate and connect them together and seal them together. Set to the side and allow to dry.
Step 2: Proceed with Mickey Ears
Use 2 black chocolate candy melts and cut a straight edge on one side of the melt. In a bowl with the remaining black chocolate melts, place it in the microwave for 30 seconds. Dip the straight edge of the candy melt into melted chocolate and place the ear melted chocolate side down onto the top of the hot cocoa bomb. Place in the freezer for a few minutes to harden.
In a bowl, melt a few yellow candy melts in the microwave for about 30 seconds and mix to combine. Place in a disposable piping bag and cut the tip-off. Pipe Mickey's buttons on the front of the red part of the cocoa bomb. Place back in the freezer for a few minutes.
Step 3: Prep the Hot Chocolate
Bring milk to a simmer over medium heat until hot. Take your Lindor truffles or take your Mickey cocoa bomb and place it in your mug. Once milk is heated, pour over the truffles and whisk until they are melted and well combined. Also, garnish your mugs with any of the extra items on the board.
Step 4: Assemble and Serve
Choose a large, flat, wood board, or a glass serving board.

You can also choose to use a Mickey Mouse head wood board!
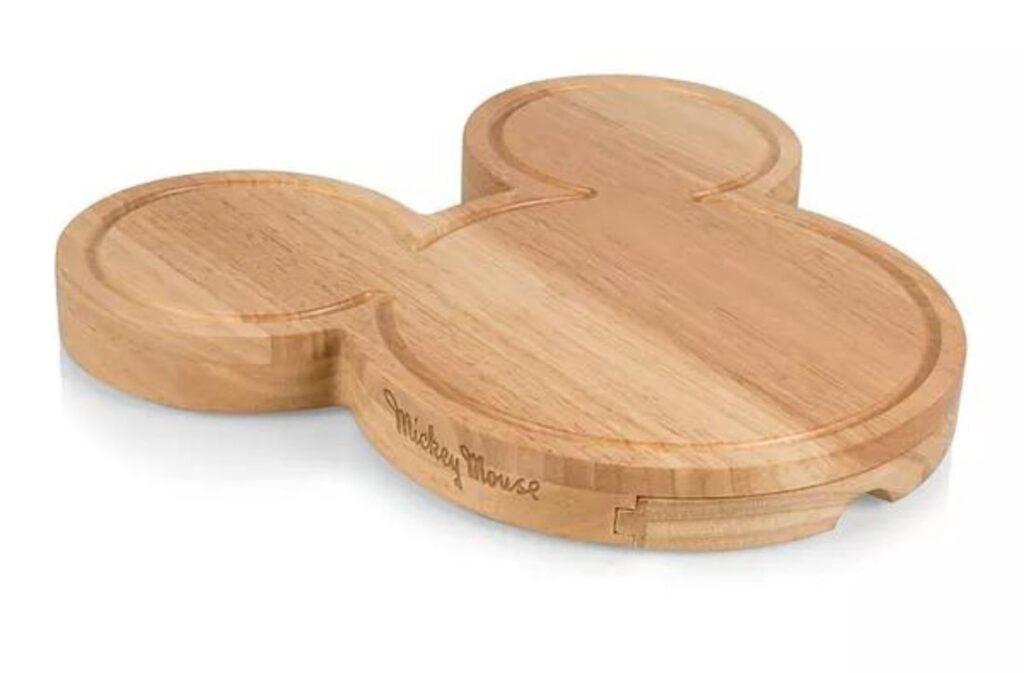
Add the cocoa bowl, cookie cutters, and small ramekins to the board.

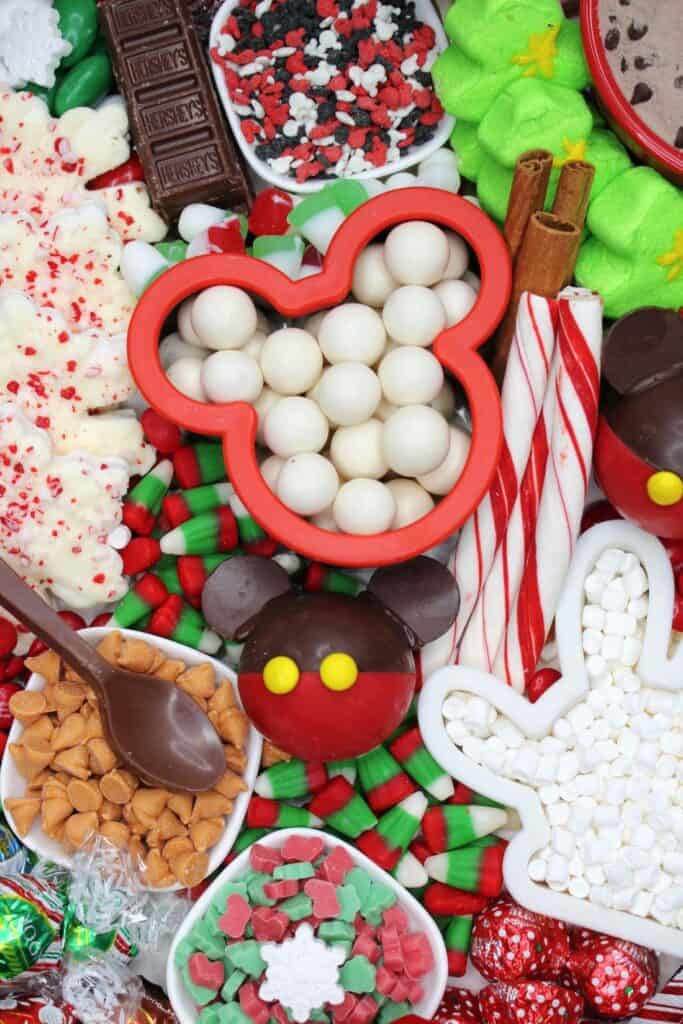
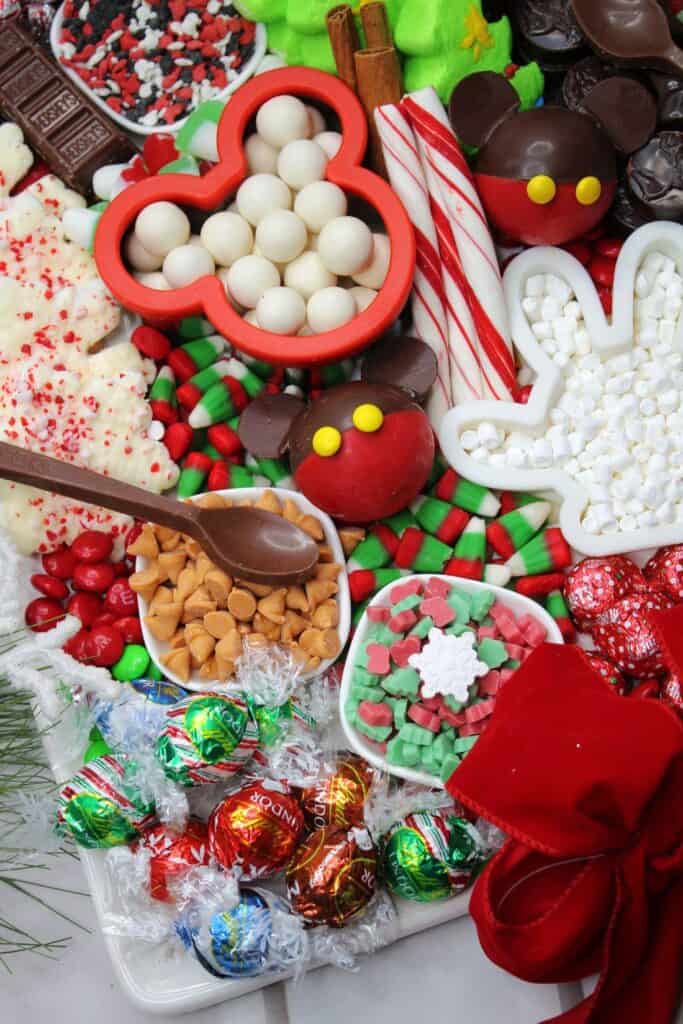
Fill the cookie cutters with the mini marshmallows and snowball whoppers. Then, fill your ramekins with the sprinkles and baking chips.

Now add the rest of your items in various places filling in all holes on the board. Place the Mickey Cocoa bombs on top.

Serve and enjoy the charcuterie board.
This recipe yields 8 to 10 servings and can be prepared for about 35 minutes.
What to Serve with Your Hot Cocoa Charcuterie Board
Appetizer or Dessert
This hot cocoa board will complement any table setting. With a fun assortment of sweet little snacks, your guests' mouths will water for more.
Drinks
For a more traditional twist, serve with champagne or sparkling wine. A hot cup of coffee or hot chocolate can help offset the amount of sugar on this board.
Desserts
A dessert version of the Charcuterie Board can be a great source of inspiration. On the board, snack-style desserts can be mixed and matched.
Popular Substitutions & Additions
Aim for variety because this board can be completely customized to your liking. This board has no restrictions on what you can put. Maybe you could base your board on a specific theme or color scheme. You could decorate this board for any holiday that you are celebrating!
All of the snacks that surround the board are optional and can be substituted for something else. Try adding the following for a little extra flair:
- wholesome fruits and vegetables
- a variety of nuts
- something salty to counterbalance the sweetness
- Desserts, pre-packaged or homemade
To make cleanup easier, place parchment paper on your board before adding your ingredients.
How to Store Mickey Mouse Hot Cocoa Charcuterie Board
Best Way To Store Hot Cocoa Charcuterie Board Leftover
Sure, having a charcuterie board is nice for any occasion, but we don't want to waste any leftovers. Make sure to put leftovers in resealable plastic bags or containers.
How Long Will Mickey Mouse Hot Cocoa Charcuterie Board Last In the Fridge?
The charcuterie board can be kept in the refrigerator for a few hours before serving, but make sure to give it 10 to 15 minutes before serving.
Can I Freeze Mickey Mouse Hot Cocoa Charcuterie Board
Hot chocolate bombs can be frozen, however, they must be wrapped and stored properly. It is recommended to wrap them in two layers of plastic wrap and foil, then put them in a freezer-safe glass jar. They will last around 6 months if stored this manner.

FAQs
Can I leave the Charcuterie Board in the fridge?
No, it is unnecessary to refrigerate the entire Charcuterie Board; however, knowing which items are better cold and which are better at room temperature will improve the overall experience.
Can you use any board for charcuterie?
Yes, you can use any shape or size of board you want. The board does not have to be made of wood; anything will do, including round lazy Susan or large rounds with handles. You can also use a slate or tray.
Is it necessary to keep hot chocolate bombs chilled?
No, a bomb cup is room temperature and does not need to be refrigerated. However, you may freeze it to prolong its shelf life.
Can I make bomb cups ahead of time?
Yes, bomb cups can be prepared up to two months ahead of time.
Is it possible to put together a Charcuterie Board ahead of time?
Yes, you can make the entire board ahead of time or just the cured meat and cheese. The board can be wrapped and chilled up to 24 hours ahead of time.

Other Charcuterie Board Recipes You’ll Love
Charcuterie board spreads have been one of the most popular food trends on social media this year. Even if charcuterie boards appear to be a little fancy, they can also be whimsy and fun.
People on social media are incorporating their love of food and Disney's Mickey Mouse into the art of charcuterie in some inventive and delicious ways.
You can try these fun and fascinating recipes in addition to this hot cocoa board:
Mickey Mouse Hot Cocoa Board Recipe
Mickey Mouse Hot Cocoa Board
Equipment
- Board or Plate
- Serving Knives (Optional)
- Ramekins
- Mickey Mouse Mold
- Mickey Mouse Cookie Cutter
- Mickey Mouse Hand Cookie Cutter
- Semi-Sphere Silicone Mold
- Piping Bag or Zip Lock Bag
Ingredients
Cocoa Ingredients:
- 1/2 cup Butterscotch Baking Chips
- 10-12 Godiva Mint Filled Chocolates
- 1 cup Milk Chocolate cocoa powder mix 1⁄2 cup Hershey Candy Cane Kisses
- 3-6 White Chocolate Lindor / Lindt truffles 3-6 Peppermint Lindor / Lindt truffles
- 3-6 Maple Lindor / Lindt truffles
- 3-6 Snickerdoodle Lindor / Lindt truffles 3-6 Chocolate Lindor / Lindt truffles
- 2-3 Mickey Cocoa Bombs
Extras:
- 1/2 cup Christmas Baking chips
- 4-5 Snowflake Marshmallow huggers
- 4-5 Ghirardelli Peppermint Bark
- 1/2 cup White Chocolate Snowball Whoppers 6-7 Hershey candy Bells
- 1/4 cup Mickey Mouse Candy Sprinkles
- 1/2 cup Christmas Tree Marshmallows
- 1/2 cup Peppermint Stripe Marshmallows
- 5-6 Peppermint sticks
- 1 Hershey chocolate bar
- 1 Hershey cookie Bar
- 2 Chocolate Spoons
- 3-4 Peeps Christmas Trees
- 1/2 cup Christmas Candy Corn
- 1/2 cup cup Red & Green M&M’s
- 1/2 cup Winter snowcap jelly candy
- 1/2 cup Jordan Almonds
- 8-10 White Chocolate Pretzels
Mickey Hot Chocolate Bomb Ingredients
- Red candy melts chocolate melted
- Black candy melts chocolate melted
- Yellow candy melts chocolate melted
- Piping bag or zip lock bag
- Mini marshmallows
- Hot cocoa mix
- Semi-Sphere silicone mold
- Hot Milk
Instructions
- Start with Mickey Cocoa Bomb
- Add red chocolate to a small bowl and melt in the microwave in 30 seconds.
- Mix to combine.
- Place the red chocolate back in the microwave for another 30 seconds and mix again to combine.
- Repeat this step for the black chocolate.
- Fill ½ of the molds with red melted chocolate ⅓ of the way full.
- Swirl the mold to get the red chocolate to coat all sides of the mold and keep the center hollow.
- Repeat with the other half of the molds with the black chocolate.
- Place in the freezer for about 25 minutes.
- Very carefully remove the chocolate from the mold.
- In the red half add cocoa mix and mini marshmallows.
- Heat a small frying pan on low, take one of the black chocolate halves and press the open edges onto the pan for a few seconds to melt the chocolate.
- Connect the black half to the red half chocolate and connect them together and seal them together.
- Set to the side and allow to dry.
- Proceed with Mickey Ears
- Use 2 black chocolate candy melts and cut a straight edge on one side of the melt.
- In a bowl with the remaining black chocolate melts, place it in the microwave for 30 seconds.
- Dip the straight edge of the candy melt into melted chocolate and place the ear melted chocolate side down onto the top of the hot cocoa bomb.
- Place in the freezer for a few minutes to harden.
- In a bowl, melt a few yellow candy melts in the microwave for about 30 seconds and mix to combine.
- Place in a disposable piping bag and cut the tip-off.
- Pipe Mickey's buttons on the front of the red part of the cocoa bomb.
- Place back in the freezer for a few minutes.
- Prep the Hot Chocolate
- Bring milk to a simmer over medium heat until hot.
- Take your Lindor truffles or take your Mickey cocoa bomb and place it in your mug.
- Once milk is heated, pour over the truffles and whisk until they are melted and well combined.
- Also, garnish your mugs with any of the extra items on the board.
- Assemble and Serve
- Choose a large, flat, circle wood board or a Mickey Mouse head wood board.
- Add the cocoa bowl, cookie cutters, and small ramekins to the board.
- Fill the cookie cutters with the mini marshmallows and snowball whoppers.
- Then, fill your ramekins with the sprinkles and baking chips.
- Now add the rest of your items in various places filling in all holes on the board.
- Place the Mickey Cocoa bombs on top.
- Serve and enjoy the charcuterie board.
WHATS NEXT
Please return and share your thoughts and experiences with me on how your Mickey Mouse Hot Cocoa Board turned out, and let me know how you enjoyed it!
If you get a chance to try it, let us know! Leave us a comment below, or share it with a picture on Instagram or Facebook! Don’t forget to tag us @sweetandsavorymorsels and use the hashtag #sweetandsavorymorsels so we can see what amazing meals you are cooking!
Sharing is caring!
