
PENCIL TREAT BAGS
These adorable Pencil Treat Bags make a great teacher gift for Meet the Teacher or the first day of school. They're also perfect snacks for your child's lunchbox. They're easy to make and only take a couple of minutes to put together. These pencil treat bags are not only practical, but also a delightful way to add a special touch to the start of the school year.

In this blog post, we'll walk you through the recipe step by step, ensuring you have all the tips and tricks to make these adorable Pencil Treat Bags. From gathering the ingredients to assembling the layers, we'll provide detailed instructions to help you create these delightful Pencil Treat Bags with ease.
Whether you're making them as a thoughtful teacher gift or as a fun addition to your child's lunchbox, we've got you covered with everything you need to know to make them. Get ready to impress with these charming and delicious snacks!
Why You'll Love This Pencil Treat Bag
- Quick and Easy to Assemble: Perfect for busy parents and caregivers, these treat bags come together in just a few minutes.
- Delicious Flavor Combination: The mix of sweet and salty ingredients is a hit with both kids and adults.
- Adorable Design: The pencil shape adds a fun and creative touch, making them perfect for school-related events.
- Versatile Uses: Great as teacher gifts, lunchbox snacks, or party favors.
- Family Fun: An excellent opportunity to involve kids in the kitchen, making the preparation process enjoyable for everyone.
Giving your teacher a gift they'll love on Meet the Teacher day or the first day of school is a thoughtful way to start the school year off on the right foot.
Teachers work tirelessly to prepare for the school year, and a small, heartfelt gift can make them feel valued and recognized. The joy and surprise on their face when they receive something as creative and delightful as Pencil Treat Bags is priceless.
Pencil Treat Bags also make fantastic snacks for your child's lunchbox. With their adorable pencil-like appearance, these treats add a fun and whimsical touch to any meal.
Involving your child in the preparation of these Pencil Treat Bags can be a fun and educational activity. It encourages creativity and helps them develop basic cooking skills. As they help make the Pencil Treat Bags, they also learn the value of giving and the joy of making something special for others.
Equipment Needed to Make Pencil Treat Bags
- 1 9.8” by 5.1” Cone Shaped Treat Bag
- 1 12-Inch Strip Pink Curling Ribbon
- Scissors
Ingredients for Your Pencil Treat Bags

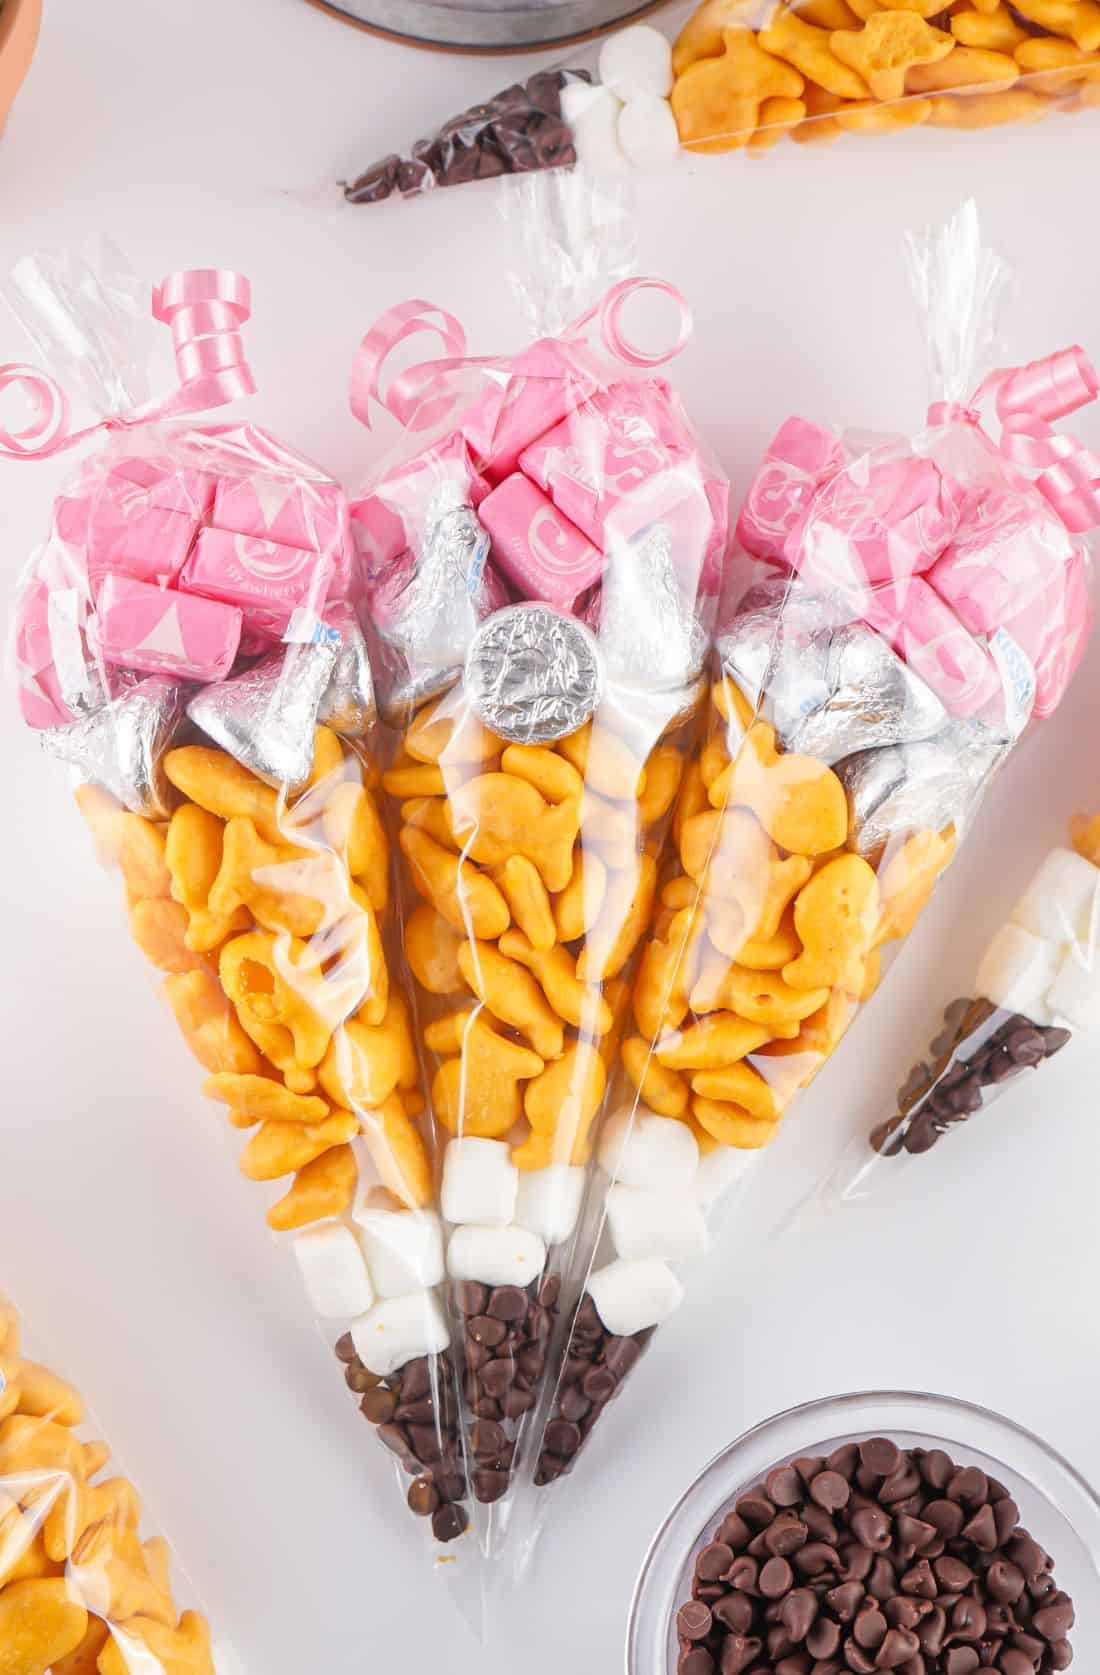
- 9 Pink Starbursts
- 7 Chocolate Kisses
- ⅓ Cup Goldfish Crackers
- 4 Mini Marshmallows
- ½ Teaspoon Mini Chocolate Chips
How to Make Pencil Treat Bags
Step 1
Place the chocolate chips in the treat bag and give it a good shake to make them settle into the tip a bit more.

Step 2
Add the marshmallows, followed by the goldfish crackers. Give another good shake to make everything settle and fill in holes.

Step 3
Add the chocolate kisses and finish by adding the pink Starbursts.

Step 4
Bunch the top of the treat bag up and tie it with pink curling ribbon. Don’t tie a bow, just do a double knot.

Step 5
Curl extra ribbon ends using scissors. Enjoy!

Popular Substitutions & Additions
Substitutions and Additions
If you need to make adjustments to the ingredients or want to add a little extra flair, there are plenty of easy substitutions and additions to ensure your Pencil Treat Bags turn out just as delightful. Here are some recommended substitutions and additions:
- Pretzel sticks: Use thin breadsticks or wafer sticks for a similar crunch.
- Mini marshmallows: Small pieces of white chocolate or yogurt-covered raisins work well.
- Pink candy melts: Pink frosting or white chocolate with a few drops of red food coloring can be used.
- Chocolate chips: Mini M&Ms or chocolate-covered sunflower seeds are great alternatives.
- Additions: Sprinkle edible glitter, add small candy decorations, or tie the treat bags with themed ribbons or your child's school colors for an extra special touch.

Pencil Treat Bags FAQs
Can I use different types of candy melts? Yes, you can use any color or flavor of candy melts you prefer.
Are there any alternatives to mini marshmallows? You can use small pieces of white chocolate or another small, white candy as a substitute.
How should I store the treat bags? Store them in an airtight container or sealed treat bags to keep them fresh.
Can these be made ahead of time? Yes, they can be made a few days in advance and stored properly.
Are these suitable for children with allergies? Be mindful of the ingredients if there are allergy concerns, and consider using allergen-free alternatives if needed.
Can I personalize these treat bags? Absolutely! You can add personalized tags or decorations to make them extra special.
Can I make these pencil treat bags gluten free? Yes, to make these Pencil Treat Bags gluten-free, you can easily substitute the goldfish with gluten-free goldfish. You can substitute all of the ingredients with gluten-free ingredients. Many stores offer gluten-free versions of these snacks, which will provide the same crunch and shape needed for the pencil design.
Pencil Treat Bags create a delicious and eye-catching snack that will impress your child's teacher with just a few simple ingredients and steps.
So, gather your ingredients and get ready to make these delightful treats!
For more delightful recipes, check out our others treats like Firecracker Pretzel Rods, Barbie Pool Frosting Board, or our Harry Potter Sorting Hat Frosting Board. Enjoy your Pencil Treat Bags, and happy first day of school!

PENCIL TREAT BAGS, EASY RECIPE
Equipment
- 1 9.8” by 5.1” Cone Shaped Treat Bag
- 1 12-Inch Strip Pink Curling Ribbon
- Scissors
Ingredients
- 9 Pink Starbursts
- 7 Chocolate Kisses
- ⅓ Cup Goldfish Crackers
- 4 Mini Marshmallows
- ½ Teaspoon Mini Chocolate Chips
Notes
If you use bigger treat bags, you’ll either need more ingredients or you’ll just end up with a bigger leftover tufted tail on the treat bag. Totally up to your preferences. I liked the tail leftover on the bags to be smaller.


